I filled an old training ball in the back garden one evening and started chucking it at the garage wall – at first the water sloshed and the ball felt all over the place, then I added a bit of washing-up liquid, gave it a good shake and suddenly it behaved like a heavier match ball. The difference when I switched back to a normal ball was ridiculous, felt like cheating almost. Use a small squirt of washing-up liquid, then shake the ball thoroughly to create a frothy mix that stops the water sloshing.
- Use a standard training ball and a tap adapter to fill it safely. Connect the adapter to a household tap, push the valve onto the adapter and fill slowly – no DIY hacks, no damage to the bladder, and most fills take under two minutes.
- Add a tiny amount of washing-up liquid before filling and shake the ball to mix it into a light foam. That foam stabilises the water so the weight stays even during explosive throws and the ball still bounces like a real football.
- Adjust the weight to suit your session by adding or removing water. Test the balance and bounce after each change and aim for a consistent feel across reps – you want overload training, not a wild, unpredictable ball.
- Train with the water-filled ball for reps off a wall to build fast-twitch power for long throw-ins. The ball keeps the same size and touch as a match ball, so strength gains transfer directly to your game; practise twice a week and most players see noticeable gains within a fortnight.
- Avoid using high-end thermal-bonded match balls and don’t overfill or force the valve. A leaky valve or a damaged bladder makes the ball useless and can cause erratic movement that risks shoulder or elbow strain – stick to an old training ball you don’t mind dedicating to heavy-ball work.
Seriously, don’t do a DIY hack or you’ll ruin your ball
Most players who try this without the right tool end up with leaky valves, a damaged ball bladder, or an unbalanced ball where the water shifts around during training. You think a screwdriver and a funnel will do the job, but then you end up practising with a lopsided mess that doesn’t behave like a real soccer ball, and you’ll pay for it.
The nightmare of the unbalanced, sloshing ball
Imagine the water shifting mid-throw so the ball veers off – that unstable weight causes erratic movement and ruins drills, because most players who DIY end up with a ball that doesn’t act like the real thing, it’s messy and useless, honestly.
Protecting your shoulders and elbows from strain
If you practise with that sloshing, unpredictable weight you put serious strain on your shoulder and elbow, and you’re risking injury when the ball doesn’t react like a real soccer ball – so don’t do it, just don’t.
You can avoid all that by not filling a ball with water at home and by using the correct tool or a purpose-made weighted ball, because when the water sloshes it puts odd torque on your shoulder and elbow during follow-through and you’ll feel it fast, niggling tendon pain that won’t go away.
You’re risking injury if the ball doesn’t react like a real soccer ball.
So check balance, test the valve, or buy a properly weighted training ball instead – it’s cheaper than a physio bill.
Here’s the real deal on the right way to fill it up
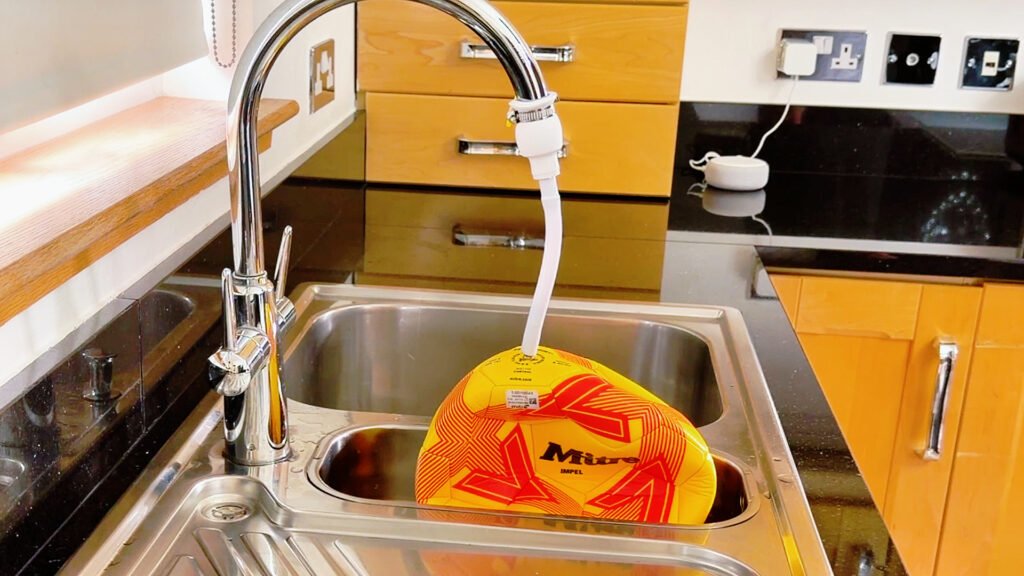
You can do it from your kitchen sink, who would’ve thought? The Long Throw Coach Tap Adapter connects directly to any standard household tap and fills your ball in under two minutes with zero damage to the valve. To make the system work correctly, you just need a small amount of washing-up liquid which mixes into a light foam, helping distribute the weight evenly while still allowing it to bounce like a normal football.
Using the adapter for a two-minute setup
Connect the Long Throw Coach Tap Adapter to any standard household tap, open the water and watch it fill your ball in under two minutes with zero damage to the valve, quick and hassle-free.
Why a little washing-up liquid goes a long way
Add just a small splash of washing-up liquid so it forms a light foam that helps distribute the water, keeping weight even while the ball still bounces like a normal football.
Because that light foam traps tiny bubbles and reduces internal slosh, you get steadier throws and far less erratic flight, so your heavy-ball sessions feel consistent; try barely a drop – overdo it and you’ll make a mess, but the right amount balances the weight and keeps the ball behaving like a normal football.
Why I think this beats a medicine ball every single time
Compared to a medicine ball, a water-filled ball gives you proper match transfer: A water-filled ball reacts to your hands and the ground exactly like a standard football, so everything you build in training transfers directly into your game. The bounce is a total game-changer because you can do continuous reps off a solid wall without needing a partner, something a medicine ball just isn’t built for. So your touch, timing and decision-making actually carry into real matches.
Getting that real-world match feel
Unlike bulky weighted balls, a water-filled ball moves and sits under your foot like the ball you see on matchday – it reacts to your hands and the ground exactly like a standard football, so you practise the same touch and tempo you’ll use in games, not some awkward strength-only drill.
Why the bounce lets you train solo
Whereas medicine balls just thud and die, a water-filled ball snaps back so you can keep going; the bounce lets you do continuous reps off a wall without a partner, giving you volume, rhythm and sharpness in one short session.
You can ramp reps up fast, hit wall drills for minutes, rest a little, then go again – repeat until your touch’s tired but true. Want to work first touch, volleys, chest control and quick passing on your own? The bounce does the heavy lifting. The bounce is a total game-changer. You’ll end sessions feeling match-ready, not just gym-sore.
Picking the right ball and getting the setup perfect
Want a heavy ball session that actually works? Any standard synthetic leather training ball works well for this, but you shouldn’t use high-end thermal-bonded match balls as the construction is different, so pick a worn but intact trainer. The adapter features a universal multi-fit design for garden or indoor mixer taps, and you can adjust the weight at any time by adding or removing water to fine-tune your training phase.
Never use a thermal-bonded match ball for filling.
Why old training balls are your best friend
Got an old training ball lying about? You’ll find that secondhand synthetic leather trainers take water and wear better, they’re cheaper to sacrifice and they handle being heavier without shredding the seams, so use them for heavy-ball drills and save your match balls for matchday.
Connecting to garden taps and indoor mixers
Can your tap take the adapter? The adapter features a universal multi-fit design for garden or indoor mixer taps, so you can clip it on, give it a turn and let the water in without faffing about with odd fittings.
Which seals and bits should you check so you don’t end up ankle-deep with a broken hose? Fit the adapter snugly, use the rubber washer supplied if there is one, tighten by hand then test at low pressure – small drips are normal but a steady leak means you need a different washer or a tighter seat, and always keep a cloth handy.
Test for leaks before you carry the ball anywhere.
Adjusting the weight for different training phases
How do you tweak the weight between sessions? You can adjust the weight at any time by adding or removing water to fine-tune your training phase, so add in small amounts and try a few kicks to check the feel.
So what’s a sensible way to progress without wrecking your technique? Start light for a week or two, add small bursts of water each session until the ball feels heavy but controllable, then back off if your form breaks – it’s trial and error, you’ll know when it’s right, and always drain a bit after heavy work so it’s not a pain to move.
Conclusion
As a reminder, filling a ball correctly turns it into a dedicated training tool that ensures your strength gains transfer directly to the pitch while keeping your joints safe. You should add water evenly, test bounce and weight, and use it for progressive overload so your legs get match-ready without wrecking your knees.
FAQ
Filling a soccer ball with water gives you a heavy training ball that keeps the exact size, shape and bounce of a match ball – train with it and your throw-in power will jump noticeably.
Q: Can I put water in any soccer ball?
A: Most standard synthetic-leather training balls take water fine. Match-level thermal-bonded balls have different construction and are best avoided; use an older or dedicated training ball instead. Leather balls and cheap foam balls won’t cope well.
Q: What tools and kit do I need to fill a ball safely?
A: Use a proper tap adapter that fits the valve – the Long Throw Coach Tap Adapter is one example that creates a watertight seal and fills the bladder without yanking the valve. You’ll also want a towel, a small funnel or the adapter’s nozzle, and a tiny squirt of washing-up liquid.
A: Add a drop or two of washing-up liquid into the bladder through the valve before you fill. Shake the ball to mix so the water foams slightly – that foam stabilises the weight and reduces slosh, keeping the ball predictable during dynamic throws.
Q: How much water should I add and how do I check balance and bounce?
A: Start light and build up – I’d aim for 250-600g extra depending on your strength and training phase. Fill a little, test a few throws or wall reps, then add more. If the ball feels like the weight shifts inside, take some water out and add a touch more washing-up liquid, then shake again.
A: Test bounce by dropping the filled ball from chest height onto a hard surface and watch how it reacts. It should still rebound like a regular ball but with heavier momentum. If it’s wobbling wildly it’s not properly mixed or the valve wasn’t sealed correctly.
Q: How do I avoid leaks and a damaged bladder?
A: Never force a hose directly into the valve or use DIY hacks that stretch or pry the valve. Use an adapter that seals around the valve and fills slowly under control – that avoids tearing the inner bladder. Dry the valve lip before connecting the adapter so you get a tight seal.
A: Don’t overfill to the point the bladder is under constant pressure. You still want some internal air so the ball keeps its shape. After filling, wipe the valve area, give it a gentle tug to check integrity, and keep the heavy ball as a dedicated training ball rather than switching it back to match play.
Q: How should I train with a water-filled heavy ball and how quickly will I see gains?
A: Use overload reps – throw from your normal technique to reinforce the movement under resistance, twice a week for two to four weeks. Short focused sets off a wall work best, they hit fast-twitch fibres and the contrast when you return to a standard ball is immediate.
A: Ease into it. If a heavy ball feels unstable, stop and adjust weight or foam mix. Shoulder and elbow strain comes from poor balance or using too-heavy a load, so build progressively and pay attention to how your body feels after sessions.